How To Automate Marketplace Workflows with Make.com
Discover how Make.com can automate your marketplace workflows. Learn to streamline operations like onboarding, notifications, and payments, and create a scalable platform with less manual work.

Why Make.com Is the Best Automation Tool for Marketplace Builders
There are tons of ways to automate workflows—code, Zapier, n8n, Whalesync, and more. I’ve tried them all. The one I use the most, and that I’ve found most impactful, is Make.com, and here’s why:
- Visual Workflow Builder: Make.com allows you to design workflows visually, making it significantly easier for complete beginners to get started with automations. Simply select your apps and connect them to each other.
- Seamless Integrations: Make integrates with nearly every major software tool you might use to power your marketplace. Even in the rare case that your tool doesn’t have a native Make.com integration, you can use their custom HTTP module, assuming your tool has a public API.
- Cost-Effective: Out of all the major automation tools, I’ve found that Make offers the best bang for your buck. While it’s not the cheapest at the higher end, Make is flexible and allows you to scale as your needs grow. I currently have about 150 workflows powering various aspects of Unicorn Factory New Zealand and Unicorn Factory Canada. These workflows handle everything from freelancer signups to connecting clients and freelancers via email to managing payments. Anytime I found myself doing something more than three times, I looked for a way to automate it—and after five years, this is where we are. The beautiful thing about these tools is that they are much simpler to use than you might think—you only need to understand a few key concepts.
How Automation Tools Like Make.com Work
If you want to understand how all automation tools work at their core, you only need to grasp the concepts of triggers and actions. All automation tools—including [Make.com](), Zapier, or even custom code—operate on this principle:
- Triggers: The event that starts your workflow. This could be something simple, like a form submission on your website, receiving an email, a change in your Airtable database, or you clicking a button in your app.
- Actions: The logic that follows the trigger. Examples include sending an email, adding a new profile in Webflow, upgrading a freelancer to the professional tier, and more. These actions are automated versions of the tasks you’d otherwise have to complete manually when a specific event occurs.
From Form to Inbox: How Automation Simplifies Your Workflow
Here’s a real-life example of how automation works, broken down step by step:
- Trigger: When someone submits a form on your Webflow website (e.g., a potential client fills out a job inquiry form), this event kicks off the workflow.
- Action 1: The form submission details (such as the client’s name, contact information, and project description) are automatically sent to Airtable. Airtable acts like a super-organized spreadsheet, where a new entry is created to store all the client’s information neatly in one place.
- Action 2: An email is then sent using Gmail, notifying either you or the appropriate freelancer about the new job inquiry. The email includes all the important details from the form submission so the recipient can follow up quickly. This automation saves you from manually copying the data from Webflow to Airtable and emailing the details yourself. Instead, everything happens automatically and instantly, ensuring no time is wasted, and no steps are missed. Once you understand this basic concept of triggers and actions, the possibilities for automation in your marketplace are endless. Let’s dive into even more marketplace-specific workflows I am currently using on Unicorn Factory.
How We Automate The Application User Journey For Freelancers
The first workflow I want to show is my "New Freelancer Applied" Workflow. This workflow notifies my team about new freelancer applications and sends the freelancer a confirmation email to acknowledge that we’ve received their application. Here’s how it works:
- The Application is Submitted: A freelancer submits their application through the Unicorn Factory platform. The trigger for this workflow is a webhook, which acts like a custom alert that fires whenever a new record is added to my Airtable Freelancer Table.
- Freelancer Details are Pulled from Airtable: Once the webhook triggers, Make.com retrieves the freelancer’s details from Airtable—such as their name, skills, and portfolio links. This ensures all the key information is ready for the next steps.
- A Confirmation Email is Sent: The workflow automatically sends a personalized email to the freelancer, confirming that their application has been received.
- Team Notification in Slack: The system posts a notification in our team’s Slack channel with all the relevant application details. I now have workflows set up for every stage of the freelancer application journey, including automations for when freelancers are approved, waitlisted, or declined. Not only does this save me a ton of time to focus on growing the business, but it also ensures a consistent and professional experience for my freelancers, which is crucial as you scale.
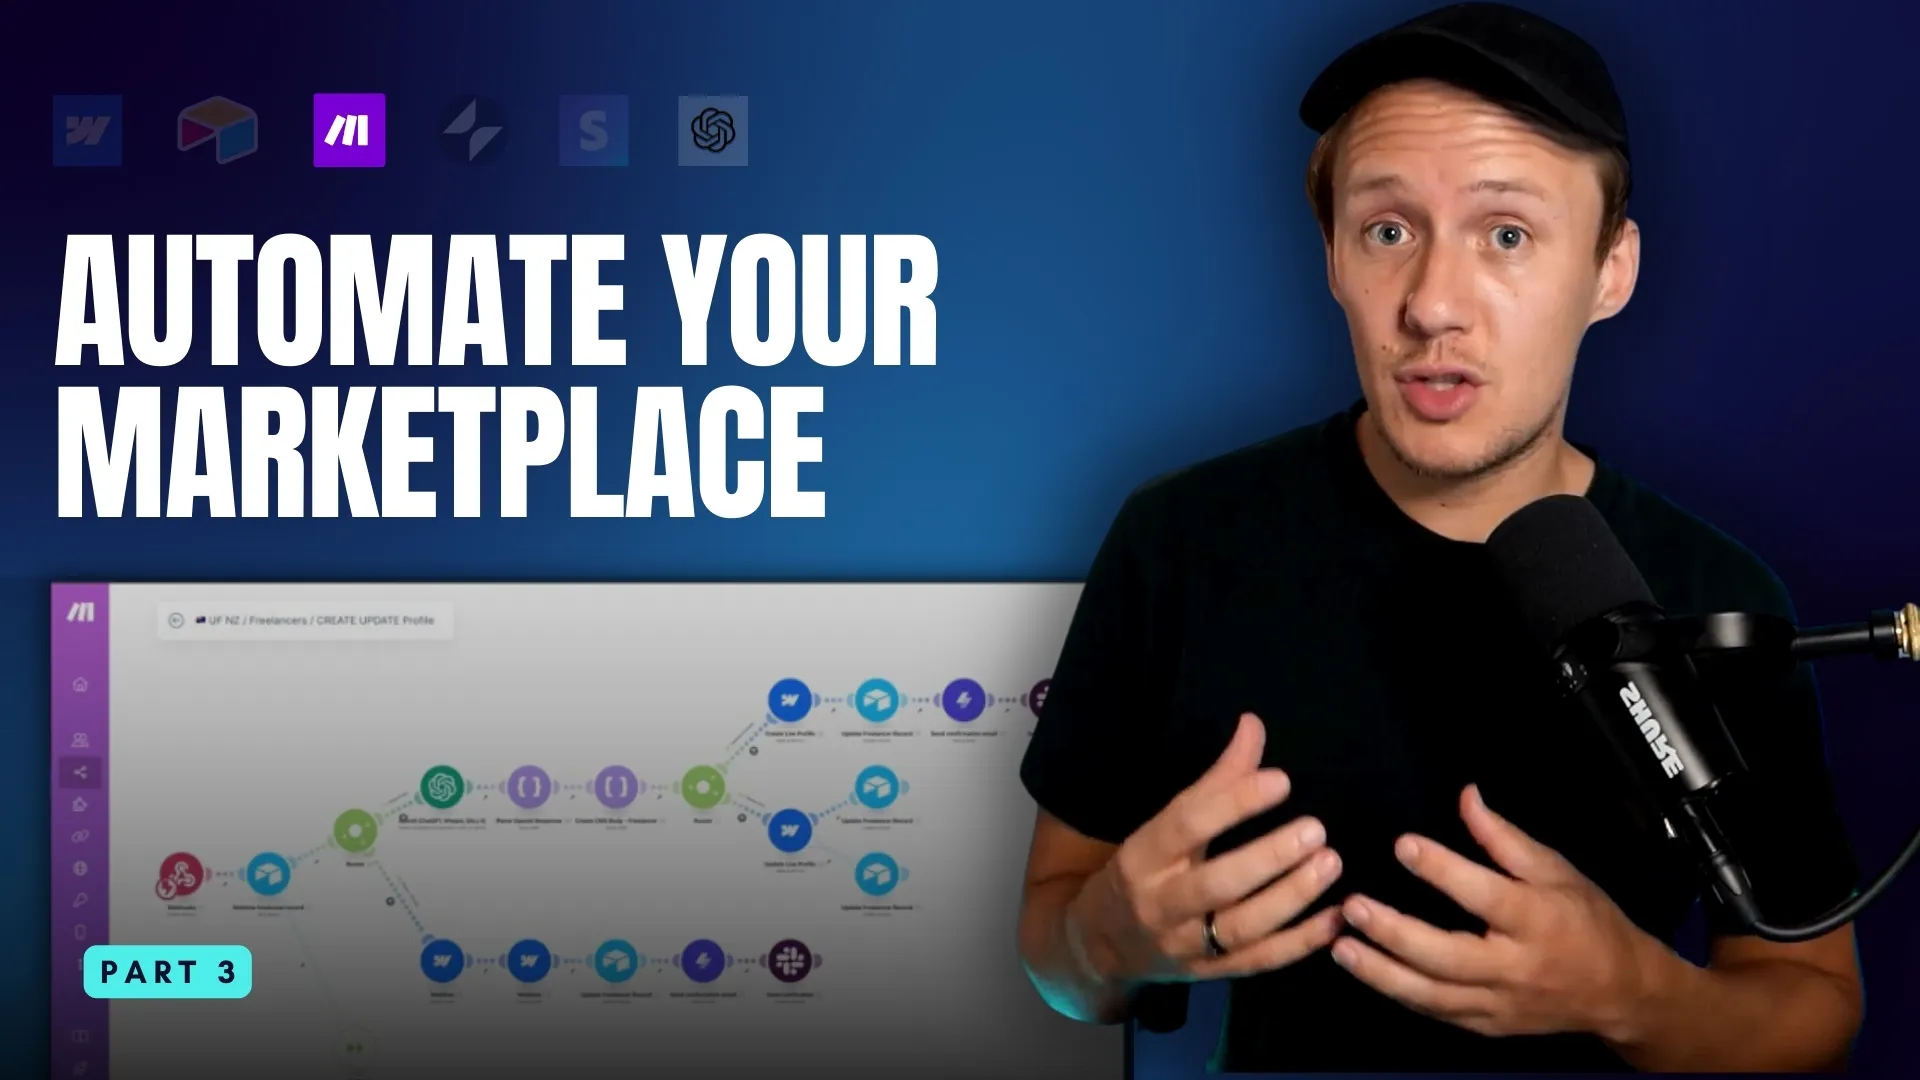
How To Create Thousands of Custom Landing Pages in Webflow in Seconds
Setting up landing pages for freelancer profiles, category pages, location-specific pages, portfolio showcases, and more manually can take a lot of time. Just populating the Webflow CMS with one landing page can take anywhere from 5-10 minutes per record, depending on how much content there is. Luckily, I’ve automated this entire process using Make.com. Here’s how it works:
- The Landing Page Request is Triggered
- The process begins when a new record is approved for publishing in my Airtable base. For example, when a freelancer purchases a membership, their status in Airtable is updated to "Live." This triggers a custom Make.com webhook, which acts like a notification to start the workflow.
- Freelancer or Page Data is Pulled from Airtable
- Once the webhook triggers, the workflow retrieves all the necessary details from Airtable—such as the freelancer’s name, skills, portfolio links, or any category-specific information.
- The Data is Structured in JSON
- The workflow formats the retrieved data into JSON, a structured format that Webflow’s CMS can easily understand. This ensures the information is prepared correctly for creating or updating the landing page.
- The Router Decides: Create or Update?
- A router determines whether a new CMS item needs to be created or if an existing one should be updated. This provides flexibility, whether you’re adding a brand-new page or making changes to an existing one.
- Webflow CMS is Updated Automatically
- If it’s a new page, the workflow creates a new Webflow CMS item with the data retrieved from Airtable.
- If it’s an update, the existing CMS item is updated with the latest information.
- Webflow IDs and Slugs are Synced Back to Airtable
- After the CMS item is created or updated, its unique ID and slug are stored back in Airtable. This keeps all systems perfectly in sync for future updates.
- Slack Notification is Sent
- Finally, a Slack notification is sent to the team with details of the new or updated page, keeping everyone informed without manual effort. This workflow is the bread and butter for anyone using Airtable as their Webflow CMS backend. It saves hours of manual work, ensures consistency, and lets you scale your operations effortlessly. Want This Workflow? If you want a copy of this workflow, it’s available in MVMP Labs as part of the Landing Page Engine Course.
Want To Learn Automation? Join MVMP Labs
Before we dive into the final workflow—a favorite among marketplace founders—let me quickly tell you about MVMP Labs. If you’re looking to master automation tools to build your marketplace business or explore other exciting use cases, MVMP Labs has you covered. Here’s what you’ll find inside:
- Over 90 Tutorials and Courses: Access a comprehensive library of step-by-step guides on using no-code tools like Webflow, Airtable, and Make.com to build and automate your MVP.
- Pre-Built Workflows: Downloadable templates to help you hit the ground running.
- Community Support: Connect with a network of like-minded founders to share ideas, ask questions, and get feedback on your builds.
- Additional Resources: Participate in live events, workshops, and access playbooks that cover common challenges and real-world examples. Click here to join MVMP Labs and start automating your marketplace today!
How We Are Using AI Automation To Improve Freelancer Bios and More
Ever since OpenAI launched its API, it’s allowed me to integrate AI tools into my workflows, and it’s been completely transformational. From automating responses to support tickets to improving job listings and helping freelancers craft better portfolio items, the possibilities are endless. Let me show you one specific example: using AI to review and enhance freelancer bios automatically. Here’s how the workflow works:
- Trigger the Workflow with a Webhook
- The process starts when a new freelancer profile is submitted or an existing one is updated. A webhook in Make.com listens for this event and triggers the workflow automatically.
- Retrieve the Freelancer’s Bio from Airtable
- Once triggered, the workflow connects to Airtable and retrieves the freelancer’s record, including their current bio. This ensures the AI has the exact data it needs to work with.
- Send the Bio to OpenAI for Improvement
- The bio is sent to OpenAI’s API with a prompt that instructs the AI to enhance it. For example, the prompt might ask OpenAI to improve grammar, clarity, and engagement while maintaining the freelancer’s original tone and intent.
- Process the AI Response
- OpenAI returns the improved bio, which is processed in the next step. Make.com’s JSON module ensures the response is clean and formatted correctly for the next stage.
- Update the Freelancer’s Profile in Airtable
- The workflow updates the freelancer’s record in Airtable with the enhanced bio. This ensures the freelancer’s profile is instantly updated and ready to be displayed on your marketplace. This workflow not only saves time but also guarantees consistent quality across all freelancer profiles. It elevates the professionalism of your marketplace by transforming user-generated content into polished, engaging bios automatically. Freelancers benefit from stronger profiles, and it leaves a greater first impression of your platform from the outset. Now that you’ve seen the power of automations for scaling and monetizing your marketplace, it’s time to put these workflows into action. Start with the examples in this post, experiment with your processes, and tailor them to your marketplace’s unique needs. With Make.com, the possibilities are endless!
Ready to learn more? Check out our Playbooks for step-by-step guidance.
View PlaybooksContinue Reading